Monday, April 2, 2012


Tata Photon Plus – Huawei EC156 Modem in Ubuntu, Fedora


I came across a problem when to connect a Tata photon plus (Huawei EC156) Modem in Ubuntu. You can use the same method in fedora. By default it is not  recognizing in ubuntu. When I plugged in the blue light starts blinking but not taken by the default network manager . On ubuntu forum I found a solution. It works great.
First make sure the following packages are installed in your Ubuntu. In most cases it is default.
* usb-modeswitch-data
* usb-modeswitch
Unplug all other USB devices from the system. Connect the tata photon plus (Huawei EC156) and see whether it is detected automatically in the network manager. In most cases it is not.Open the terminal and just fire an lsusb. You will get a HuaweiEC 156 connected to your usb.
sudo gedit /etc/usb_modeswitch.d/12d1:1505
copy and paste the following code in that.
Code:
DefaultVendor= 0x12d1
DefaultProduct=0x1505 

MessageContent="55534243123456780000000000000011062000000100000000000000000000"
Save and close the gedit. Then type
cd /etc/usb_modeswitch.d
sudo usb_modeswitch -I -W -c 12d1:1505
You will get the output as
Reading config file: 12d1:1505USB description data (for identification)
————————-
Manufacturer: HUA?WEI TECHNOLOGIES
Product: HUAWEI Mobile
Serial No.: ???????????????????
————————-
Now your Modem detected by the system. Type in the terminal
nm-connection-editor
Create a new mobile broadband connection . Select Tata Photon Plus.
Connection NO : #777
Username : internet
password: internet
Create connection and save.
Select the connection from Network Manager dropdown.
It will be connected automatically.
In My case the range of the device is not showing. Except that everything working perfect
STEPS
Script to run the modeswitch command in boot
steps
1.Open the gedit
2.Type the two commands which you want to run in two separate lines.
3.save the file with the extension .sh on the disk where ever you want and make this file as executable in the properties
4.Then right click on the desktop
5 Create launcher
6.Set type as Run in terminal
7.Give your desired name
8.Give the path of file with the extension .sh in the command box
9.Hit ok
Open the launcher…..
enter the password if required
You can change your icon in the properties of the new launcher file
Connect your device when ever required and click the new icon on the desktop
Hit the password…..
enjoy…

Related Keys:


Monday, January 23, 2012

How to Undo a Sent Email Message in Gmail


Emails are widely used everywhere, every business deal is simply texted to other person and then its again relied by the medium of email, so when ever something important is texted than its really important to check the mail before we click the send button, as it can make out something else if we simply punch some wrong words. So do we have any alternate to Undo an email if its accidently send by us.
Well if you are on Gmail the answer is Yes, well its not like you will simply go to any of your past email you send before and now you will Undo that but its gonna apply to the emails which will be sent now after installing Undo Send feature from their Labs, check full steps below.

1. Navigate to your Gmail Settings :


So the first step is to visit your Mail settings which you can access by clicking that small Gear icon and than choosing Settings.
Gmail Settings

2. Now choose Labs :


Now in settings menu you will see a Labs option click that and you will get a normal search bar where you can type anything you want from Labs.
Gmail Labs

3. Now Search for “Undo Send”


Now simply make a search for “Undo Send” which is a simple Gmail Beta Plugin which will do all the wonders, now as soon as you Enable it and click on Save your Gmail will load again so that that plugin could be brought in action.
Undo Send Gmail Labs

4. Now Compose, Send and Check :


Now its time to see this extension in action, simply compose another email or reply to anyone else, type your message and than click on Send now you will see message send and smallUndo Option to get that email back, click that and you email will be backed up in Drafts fro future use.
Undo Send
So now you have a perfect plugin for perfect emails when ever your emails get wrong just click that Undo Button and Voila ! emails back, have fun and do share this post if you like it.

Unlimited Free Facebook Access without Internet


FacebookDay by day many people are joining Facebook to connect with your family and friends who live far away from their home place, as Facebook is becoming the one social place for chatting, media sharing, commenting and distributing knowledge, its really important for every individual that he has access to his profile 24 hrs. where ever he is, with or without internet connection.
So getting popular day by day Facebook cannot loose its customer from anywhere so it has to bring some promotional tricks with which people will be engaged in using Facebook all the time. So to accomplish this thing Facebook has partnered with Fonetwish company to provide free Facebook access to all India users. So if you do not have Internet connection that also you can use Facebook with ease using your simple special message service.
So how it can be useful to you as you all have internet connection available but what if you have some phones coming from the old age and it does not support web browser or Wi-Fi connection well you can access Facebook on that too so quit impressive hmm. So if you like it check steps below to see it in action.

Update :

A small subscription fees of ` 1.00 is charged for unlimited per day access.

1. Access the Service :


Now if you want to use this you have to dial *325# which is taken from *fbk# short for Facebook, so after you dial this number a message will be promoted displaying the company providing you this free access.
Fonetwish Facebook Access

2. Entering Username & Password :

After the message is promoted like above it will automatically be dismissed and you will another screen for entering your Username like above, now just enter your Username and than click Send or Reply in iPhone. After few seconds you will get another message to enter your Password for your Facebook account enter that password and you will have access to their free service.

3. Now Update your Statuses :

That’s it now every thing is configured and you will get some default commands which you can use to update your status and many other things on Facebook for free. So status updates in few seconds as it receives to the server.

4. Limitations :

This is like a promotional gift for all Indian Facebook users in collaboration with Fonetwish, well there’s no limitation on how status will be updated but limitation is that its currently available on AirtelAircel and Tata Docomo so other’s might get this service soon.


So here you go guys Unlimited Free Facebook Access for Indian users from Facebook in collaboration with Fonetwish. SO if you have any queries you wanna ask comment section is just below so have fun :) and make sure you share this post with all your friends.

Get AVG Antivirus 2012 with Genuine 1 Year License


We have already posted many free Antivirus Software's which are promoted by companies so that they can get more customers to use their product and see how it works, and now AVG the worlds most renowned brand in manufacturing their nice Antivirus has also begun promoting their Antivirus by providing it for free to all UK Customers, hmmm that’s right this offer is for all UK Customers but well we are going to mod our browser so that it looks we are browsing from UK and hence getting that Antivirus for free.
So the process is not like 123 and we are done its bit typical as we have to mod our browser to UK Proxy but it will be fun as I am going to show how its going to be done, so follow steps below and grab your free 1 year license to this product.

1. Get a Proxy for UK :


The first step would be to get a proxy for UK, because this offer is valid in just UK so its really important that we browse this offer after modding after browser to UK proxy. So you can get one from this link, or you can use the one I used to browse below.
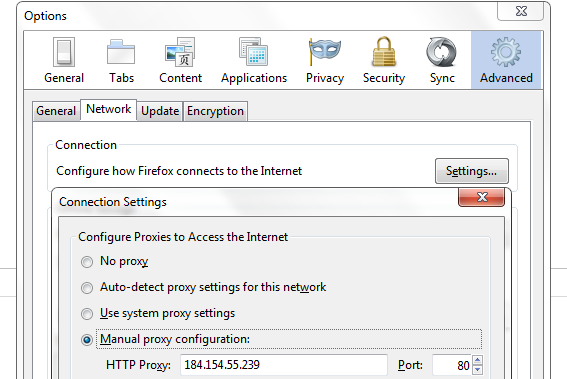
  • HTTP Proxy : 184.154.55.239  Port : 80

Now to change this thing in Firefox you have to follow below image. And make sure you tick mark use this proxy server for all protocols.
Firefox Network Options
After you have configured it with a UK Proxy now simply close and restart your browser so that your browser Proxy Server takes effect.

2. Create Account & Get Serial Code :

Now we have configured to UK Proxy, now restart and navigate to the UK Promotional Page where you have to login, create account and than get your Serial Code.
AVG Free Antivirus 2012
Now click on the Login button above and you will be promoted to Login or Create your new account create one by entering your personal credentials like below.
AVG Free Antivirus 2012
Now after you have created your account you will get an email from them to activate your account, simply click that email and your account will be activated so now if you are not automatically logged in to your account, login manually and than you will see something like below Get Serial Code click that and you will get your serial code.
AVG Free Antivirus 2012
If after clicking it says than we are manually approving than wait for few hours and you will get your code in your email. Now remember this is not your really serial which will give you the 1 year validity, now you need to enter this on AVG page to register this Serial Code and get that real Serial in your Email.

3. Register Serial Code on AVG :

Now you have your Serial Code you have to register this to get your 1 year valid serial code which will work as a license. SO visit AVG Registration Page and follow all the steps to register your Serial Code, you have to create another account here so do all those things it says and than you will get your License Code in your Email.

4. Download AVG Antivirus and Enjoy :

Now you have your license key ready to be punched in Antivirus for free 1 year genuine license, download your AVG Antivirus from their official website, and during installation when it promoted to enter your License enter that code which you got in your email and that’s it you will have a full working 1 year AVG Antivirus

7 Major Disadvantages of Most Talked Aakash Tablet


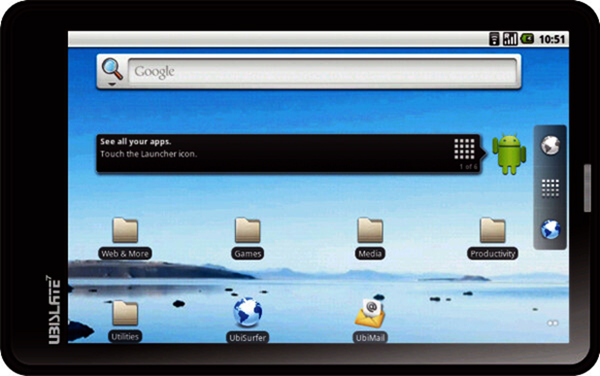
These days Aakash Tablet has become the main topic for the talk on blogs and other social networking services as it is the worlds cheapest tablet. The tablet is just costing $ 37.50 to manufacturer and would be on sold to students for Rs.1500 and to other citizens for below Rs.3000 well  the price is quit impressive but does this tablet has the potential to get good remarks on this price I hope yes because it’s a dream for any poverty level person to own nice gadgets like everyone do so this can fulfill their dream but well as normal there are few disadvantages of this tablet which you check below before purchasing Aakash Tablet.Aakash Tablet

Few Disadvantages of Aakash Tablet .:

  1. Battery Life : Aakash tablet come equipped with a 2100mAh battery which lasts upto 4 hours if you are reading EBooks but if you watching HD Movies than it will last upto 3 hours which is really low than all the major tablets out there in the market.
  2. Small Processor : Processor is the main module of any gadget and if its not good than you can imagine how gadget would be well Aakash Tablet comes with a small processorand it can result in loss of speed.
  3. No Webcam Support : Now days every gadget comes with front and back camera for video calling purpose, well you can say Aakash Tablet is the cheap tablet so everything cannot be possible but if you are a serious chatting geek than you should now that you cannot make video calls with this tablet.
  4. Heating Problem : Due to its low material major problem which people saw in Aakash Tablet was the Heating Problem, its heats up really quickly so this is the major point to check out.
  5. Display & Touch Experience : So now with this tablet do not imaging that you are going to experience the iPhone touch in this one, simply saying the touch sucks well I will compare the touch with Chinese phones so this is the major point to check out.
  6. No Bluetooth - 3G - GPRS : You just have the support to use Wi-Fi or the Dongles out there which use the USB Source to access internet, so do not think that you are going to activate the GPRS Internet plans and than going to enjoy internet on this device.
  7. No Android Market : Well the main disadvantage of this tablet is the loss of Android Market, you will not be able to access all those awesome apps on your device but market is simply configured to access only the educational apps so this simply not good.

Rajnikant’s Website Runs without Internet


Dammm its serious if you do not believe than you have too because I just saw it it and enjoyed it a lot, means what ever you say Rajni-Kant properly means that there’s nothing which Rajnikant cannot do. So when I just saw this website I was just amazed than how it can run without internet but the thing is that its really running without as it will only be accessible if you will disconnect your internet.
Rajnikants Website
So now if you wanna access Rajnikant’s website than visit www.allaboutrajni.com and you will see page like above so now disconnect your internet to access it further and than enjoy this funny website well I think its just on something like Biography type of website and than if you connect again to your Internet than this website will give you an error than disconnect your Internet again to access this website.
So here we go with another funny website which used Rajni’s Power to access website online, well I hope this is another creative concepts brought by South Designers for their GOD, hope you all like it enjoy and have fun :)

Adobe Master Collection CS5 Serial Numbers


Adobe Creative Suite (CS5) is a collection of graphic design, video editing, and web developmentapplications made by Adobe Systems. Below are some of the serial keys which will help you in making your Adobe Products full version so that you can explore all their potential easily.
Adobe Master Collection CS5 Serial Numbers

SERIALS FOR WINDOWS VERSION


1325-1263-0034-6192-0472-9778
1325-1157-8207-7707-9798-6532
1325-1319-1010-6434-1955-4619
1325-1870-2938-9873-5356-2624
1325-1174-1834-0596-8505-0323
1325-1271-7898-3364-1803-3655
1325-1823-6020-0958-5549-2729
1325-1177-2533-5307-9327-8593
1325-1960-8746-4023-7312-2320
1325-1095-0854-7085-2679-7165

SERIALS FOR MAC VERSION


1325-0150-1163-7532-1626-3430
1325-0178-1927-9019-0123-2254
1325-0702-3693-1544-9166-3515
1325-0549-2240-0071-3409-1342


NOTE 1 : Many users commented that these serials are not being accepted so here's the fix. You just have to edit the hosts file hence you have to add a line and than you have to try adding serial again and it will work, below is video that explains the whole procedure of editing the HOSTS File in Windows.

Follow below steps to edit HOSTS File in Windows .:

1. You simply have to navigate to Computer > Local Disk (C:) > Windows > System32 > Drivers > Etc. > Hosts.
2. Now you have to open the Hosts file in Notepad and than you have to add 127.0.0.1 activate.adobe.com @ the end of the Hosts file, you can see the below image as an example .:
Adobe Master Collection CS5 Serial Numbers
So remember you have to open Notepad as an Administrator so that you can save the file and if you have any problems than you can check this below hosts file and copy all the contents and replace with your default text file.

VIEW HOSTS FILE

You can also view this below instructional video on how to edit hosts file in Windows 7 well process for Windows XP is also same so just check the below video and than edit the hosts file and use Adobe products as a full version.

If you have any problems editing HOSTS File in Mac than Decoding has posted a very nice small tutorial so check that below.

Follow below steps to edit HOSTS File in Mac OS X – Leopard .:

1. Open the Terminal.app .:
Either by start typing Terminal on the Spotlight, or by going into Applications -> Utilities -> Terminal.
2. Open the hosts file .:
Open the hosts by typing on the Terminal that you have just opened .:

$ sudo nano /private/etc/hosts

Type your user password when prompted.
3. Edit the hosts file .:
The hosts file contains some comments (lines starting with the # symbol), as well as some default hostname mappings (e.g. 127.0.0.1 – localhost).
Simply append your new mappings underneath the default ones. Or edit one of the default values if you know what you are doing!
You can navigate the file using the arrow keys.
4. Save the hosts file .:
When done editing the hosts file, press control-o to save the file.
Press enter on the filename prompt, and control-x to exit the editor.

Hope everything is clear and you will be able to activate your Adobe Product now, if you have any problem feelfree to contact through commenting below.